How to Create Pivot Tables in Microsoft Excel

Sometimes, when you hear about Microsoft Excel, it seems too good to be true. Doesn’t it? You simply enter some number with a formula, and basically anything that you would need to do yourself, can be done automatically by this software. Do you need to combine two sheets with comparable information? Excel will do it for you. Do you need to do straightforward math? Excel will do it for you. Do you need to consolidate data in various cells? Excel will do it for you.

Excel has so many different features from formulas to chart and tables. Pivot Table is one of the most used tables in Excel that are usually required for different cases. But, how actually can you create a Pivot Table in Excel?

Pivot Tables are utilized to reorganize information in a spreadsheet. They will not change the information that you have, however they can total up the numbers and look at changed data in your spreadsheet, depending upon what you would like them to do.

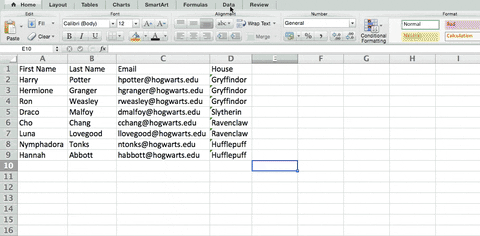
Here is an example of a Pivot Table. Suppose you need to investigate what number of individuals there are in each house at Hogwarts. You might feel that you have very little information, yet for longer data sets, this will prove to be useful.

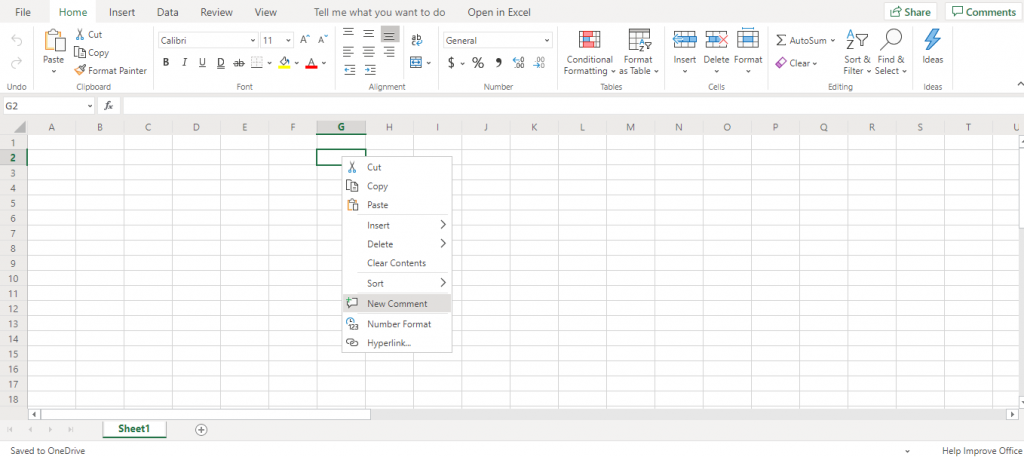
To make the Pivot Table, you should go to Data > Pivot Table. Excel will automatically draw your Pivot Table; however, you can generally change around the order of your data. At that point, you have four choices to look over.

Report Filter

This enables you to analyze a specific row in your dataset. For instance, you need to make a filter by house, you could decide to just incorporate students in Gryffindor rather than all of the students.

Column Labels

These could be your headers in the dataset.

Row Labels

These could be your headers in the dataset. Both Row and Column names can contain information from your sections, for example First Name can be moved to either the Row or Column mark – it just relies upon how you need to see the information.

Value

This area enables you to analyze your information in a different way. Rather than simply pulling in any numeric value, you can total, tally, average max, min, count numbers, or complete a couple of different controls with your information. By default, when you drag a field to Value, it generally completes a count.

Since you needed to include the number of students in each house, you can go to the Pivot Table and drag the House section to both the Row Labels and the Values. This will total up the quantity of students related with each house.

Below animation explains the whole process and will help you follow along in creating a Pivot Table in Microsoft Excel.

Creating pivot tables in Excel

New Note Feature in Office 365 Excel


Microsoft is always trying to make its products be more than a match for its competitors. Microsoft office is a pioneer in productivity niche and still remains the leader.

Microsoft office has recently launched an update with some new features. There has been some changes in all of its Office product including MS Word, PowerPoint and Excel.

There is a noticeable change in Office 365 Excel which we believe will help boost your work efficiency and effectiveness. Microsoft Office 365 has changed the way comments in Excel used to work.  

You would notice two different features which are comments and notes. Although they used to be considered as the same thing. The difference between both of these is that comments now allow you to leave a reply. Therefore, called threaded comments. While notes are meant to be used for annotations.

Comments in Excel  365

The comment now has a reply box which allows you to mention a co-worker. This allows you to start a conversation within the worksheet. Hence, increases the work efficiency.

The mentions will let your co-worker know that you need their input on that particular cell. Your co-worker can leave a reply by mentioning you in that cell or they can simply follow the comment left by you.

Notes in Excel 365

Notes used to be called comments in the earlier versions of Excel. Unlike comments, notes do not have the reply box and you could not mention your coworkers from Notes. Notes can be used to simply add a reminder without requiring an input from your coworkers.

How to insert a Comment in Office 365 Excel?

To insert a note in Office 365 Excel, follow the given step.

Step 1:

Right-click the cell and then click New Comment.

Step 2:

Use the comment box to leave your comment. You can mention a specific user to assign that comment to a user by using the @ symbol after the user name, or select a user from the dropdown list that appears.

Step 3:

Click the Post button or press Ctrl+Enter.

Your comment should be successfully posted in Excel.

What Else You Should Know?

Edit A Comment

You can click the Show Comment icon after selecting the cell, to edit a threaded comment. After clicking the show comment icon, hover over to your comment and click on the Edit button.

Delete A Comment

You can also delete a comment by right clicking on the cell and press Delete Comment button.

Edit/Delete A Reply

You can delete a reply by selecting the cell and then clicking on the Show Comments button or the little comment icon in that cell. Hover over the desired reply you want to edit or delete. Click on Edit button to edit your reply or click the Delete button to delete you reply.


How to use dropdown calendar and date picker in Microsoft Excel

Have you ever wanted a calendar to show next years date? It’s easy and convenient in most of the cases.

It can be a headache to maintain the data integrity when you are working with bigger and shared Excel worksheets. Especially, entering dates can become a nasty work. It always confuses the people if they should be mm/dd/yy or dd/mm/yy or mm-dd-yyyy? Or can you type a date like “10 Oct 2018”? Oh, and what would be the date of the third Friday in October this year?

Adding a drop down calendar in your excel sheet can solve these problems. A drop down calendar allows your users to fill the dates on a click of mouse. This guide shows you a trick that might work for you and save you tons of your time.

Before we start, you have to make sure the developer tab is available. If the developer tab is not already available in your Excel ribbons, you can follow these steps.

The first thing you need to do is click on the file in the top left of your screen and select “Options” at the very bottom of it.

This opens a new “Excel Options” box with bunch of options to select. Now click on “Customize Ribbon” which will bring out some more settings.

You should check the “Developer” option in the right hand box, under main tabs.

TADA! Now you have developer tab in your Excel ribbons. This is where all the magic is going to happen.

Now that you have the developer tab, let’s jump right into creating calendar and using it as a date picker.

In the developer tab, click on insert and go to the very bottom, where it says more controls. More controls allow you to insert a control from the set of controls available on your computer. The control we are going to use is available by default.

Once you click the more controls it open a new box with a list of options. In the list, scroll down the Microsoft date and time picker and select it.

Now you need to place the calendar somewhere on the screen. So select some part on your excel sheet and place it.
In the next step, turn off the design mode under developer tab. Now when you click on the little arrow it will bring out the calendar.

If you want to use calendar as a date picker you need to take a few more steps. Don’t worry we are almost there.

Now, turn back the design mode on again and click properties under developer tab. Under the properties click on LinkedCell and enter the cell number of your date. In my case which is B2.

Once you have assigned the date cell, turn off the design mode off again.
Now when as you pick the date from calendar it changes the date in your assigned cell.

This way you can share your excel sheet with other users and they can pick a date from calendar to fill the dates.

Excel Formatting Text

You can have parts of text constants in one cell be different sizes, fonts, color, by selecting the text and using the tools from the formatting features in the Home tab.

Here,

the word “Text” is selected, and the red font color is being applied. Only the word “Text” will be red. You can also access the font by right-clicking once the word is selected.

Privacy Settings
We use cookies to enhance your experience while using our website. If you are using our Services via a browser you can restrict, block or remove cookies through your web browser settings. We also use content and scripts from third parties that may use tracking technologies. You can selectively provide your consent below to allow such third party embeds. For complete information about the cookies we use, data we collect and how we process them, please check our Privacy Policy
Youtube
Consent to display content from - Youtube
Vimeo
Consent to display content from - Vimeo
Google Maps
Consent to display content from - Google