
 Nederlands
Part One: How to make a DYNAMIC drop-down list in Microsoft Excel
Part One: How to make a DYNAMIC drop-down list in Microsoft Excel
A drop-down list is an excellent powerful way to give multiple predefined options to your users and restrict them to select only one at a time. It is widely used on dashboards, websites and in mobile applications. A convenient and easy way to collect easy and quick data from users.
What makes many people crazy is that you always have to update the data source whenever you add a new entry. The more you add data the more frequently you need to update it.
This static drop-down list can be converted in a dynamic drop-down list. Here you do not need to update the data source again and again. A dynamic drop-down list has an advantage over static drop-down list because it automatically updates itself whenever you make a change in the source data cells.
There are different ways to make a drop-list dynamic. I will discuss two methods, namely the Table function and the Offset function.
Suppose, you have a data set as shown below.
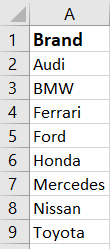
Figure 1: Given dataset of different car brands
1 Method 1: The TABLE function
An easy way to develop dynamic drop-down list is using an Excel table for source data.
- Select at least an item of your list.
- Go to ➜ Insert ➜ Table.
- Click OK.
Or - Shortcut key= CTRL + T
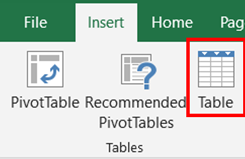
Figure 2: Excel table method
When you have created the table, give the table an appropriate name. For example tbl_BRAND
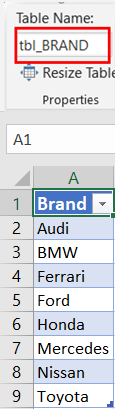
Figure 3: Table name
Our next step is to refer to the table range data source. For this we need to use the INDIRECT formula (see INDIRECT blog).
=INDIRECT (“tbl_BRAND”)
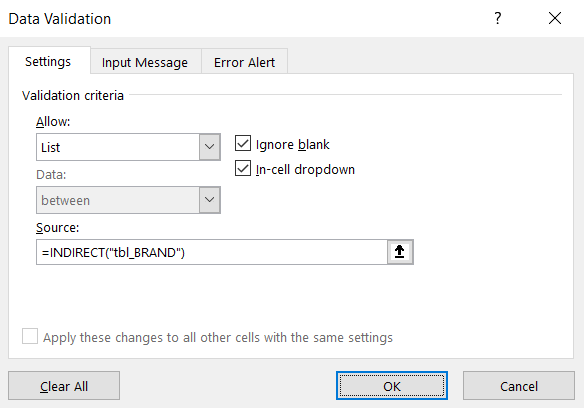
Figure 4: Data validation: Indirect function
2 Method 2: The offset function
For more detail of how this Offset function work, I refer to the blog of February 2020. The syntax of this function is:
Follow the next steps to create an Excel drop-down list using the OFFSET function.
- Select the cell where you want to create the drop-down list (e.g. C3)
- Go to Data → Data Tools → Data Validation
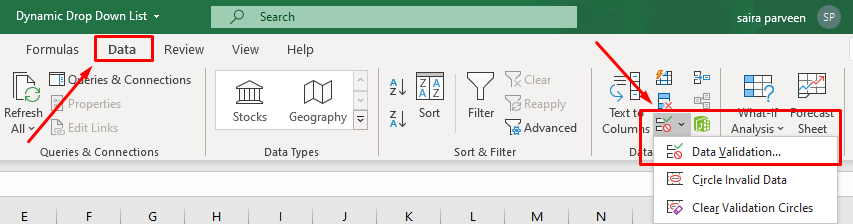
Figure 5: Finding the Data validation dialogue box
- In the Data Validation dialogue box, under the setting tab, select “list” as the validation criteria.
- A source field will appear
- In the source field, enter the formula: =OFFSET(A2,0,0,COUNTA(A:A)-1)
The breakdown of this is:- Reference is set to the first data value, A2.
- Row is 0, indicating no movement or shift of rows.
- Column is 0, indicating no movement or shift of columns
- [Height] uses a COUNTA function. Select the entire column (A: A). The COUNTA function counts all the non-empty cells. This selection includes the cell ‘Brand’ which we do not want. So(,) we have to exclude this from our selection (-1).
- [With] is 1. This is the default parameter and can be omitted.
- Check “In-cell dropdown” (if it is not)
- Click Ok
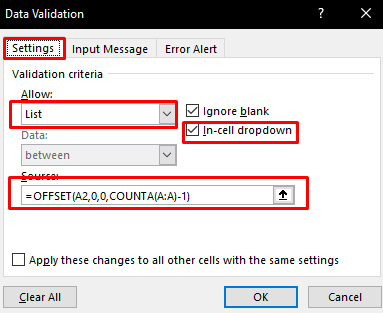
Figure 6: Data validation: Offset function
A drop-down list containing all car brands’ name will be created in the cell (e.g. C3)
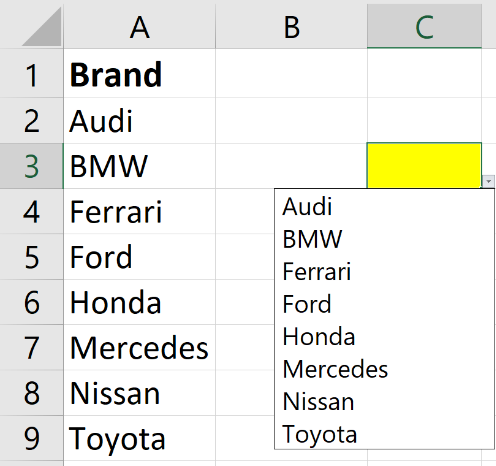
Figure 7: Offset function: Drop-down list
Now with each brand item you add in both methods to the list in column A, the drop-down list will automatically add this new item to the list without any special adjustments!